Sean & I love to travel & I have been looking for ways to decorate the condo with travel-themed decor, other than framed photographs. We've already shared our beach memory jars and some sentimental map art.
For my next travel themed DIY decor, I decided to take some inspiration from pinterest to create a way to track our trips and travels.
I started with a large roll of cork (purchased from Michaels, with a coupon of course!) I also printed out the following picture. I printed it on tabloid sized paper, which is just like two pieces of regular paper attached together.

Next, I cut the map out of the paper. I taped it to a square of cork and used a sharpie to trace the map onto the cork. I then tried to cut the cork. It was really crumbly! So, after a little googling, I decided to steam the cork to soften it up.

So, I taped the paper cut out of the map to the cork sheet and traced it using a sharpie.


See how the edge got crumbly and gross? Not ideal.

I got a big pot of water & got it to a rapid boil. I then held the cork over the steam for a couple of minutes. I then cut this section of the cork while it was still warm. The steam made it cut neatly without crumbling. I had to keep resteaming it as it cooled down.

Next I cut out the map. It took a while because I kept having to re-steam the cork every 5 minutes, but it was worth it to keep it from crumbling.


Then came the really tedious part. I left the map taped to the cork & used it to draw the state lines. I tried to push hard with a sharpie, but ended up using a scissor blade to gently rip the paper along the state lines, then traced it with sharpie to get a faint line, I then ripped off the state and re-traced the line with a thick sharpie line. It took forever but it was the most precise way that I could come up with.


I then glued the two cork pieces together using hot glue & used black craft paint to paint the edge to give it a finished look.


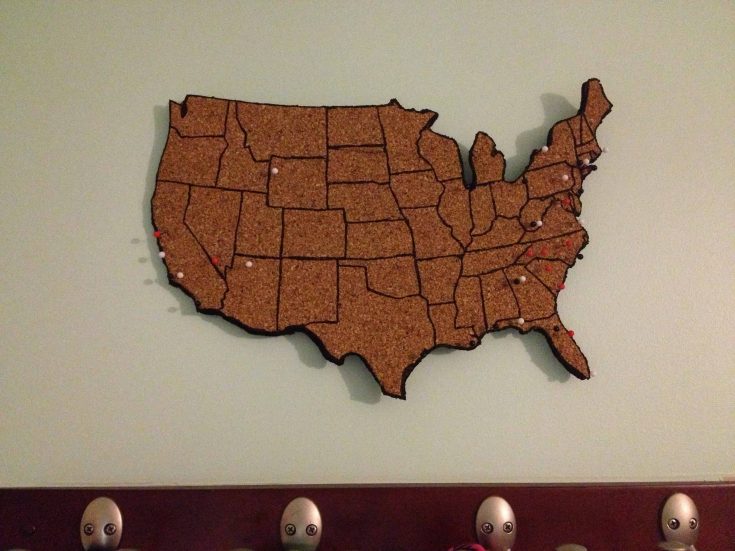
Then, when Sean was visiting, we pinned the places we have been. I am the white pins, Sean is black, and places we have been together are red. I'd love to paint the pins more fun colors soon, but do you know how hard it was to find these suckers? Very hard. Walmart, Target, Michaels, nothing. I ended up settling for boring colors at Staples just to finish the project!

I hung it in the entryway above the coat hooks just to remind us of the places we have been and to keep us excited for where life will take us next!

Do you have any map art in your home? How do you track your travels?
PS- We linked this up to the Young House Love WINTER PINTEREST CHALLENGE! Don’t forget to check in on Sherry, Katie, Megan, and Michelle to see what they did too!
How to cut cork (without it crumbling)
Cork can be used to make beautiful crafts, but, if you cut it normally it will crumble. Here is how to cut it and get a crisp edge!
Materials
- Cork sheet
Tools
- Scissors
- Pot + stove
Instructions
- Bring a pot of water to a boil
- Hold the cork over the steam for at least 30 seconds
- Cut while pliable
- Re-steam if you need to cut more

Looking for something?
We've been doing this since 2012 so we have a LOT of blog posts!
Search stuff like: Ceiling Projects | DIY Plant Stands | Thrift Flips


Melanie @ Mailbox Journey says
That turned out so good! Awesome job.
charlestoncrafted says
Thanks! I'm pretty pumped & it was not hard at all. Hardest part was finding the map pins!
Katja @ Shift Ctrl ART says
This is an amazing project and I love how you can keep track of all the states you have visited. Thanks for the tip about steaming the cork before cutting it.
It looks fantastic!!
charlestoncrafted says
Thanks for stopping by! Steaming the cork adds extra time to the project but is really crucial for cutting detail like this. Glad you enjoyed!
Our Humble Abode says
It looks time consuming, but completely worth if and adorable.
charlestoncrafted says
Thanks! It was a little tedious but easy to do while watching HGTV! Thanks for stopping by!
Sam says
I never knew you could steam cork and avoid the crumblies! I made cork-based coasters a while back and had such a problem with them. Thanks for sharing, and this looks great!
charlestoncrafted says
Thanks! I was really afraid the whole thing would fall apart because it was so dry. I guess the steam works just like steaming your skin and opens it's "pores"! I'm not sure haha I just know it worked. Thanks for stopping by!
Ashley says
That looks great! I have a roll of cork somewhere that I bought a while back but never ended up using...maybe I'll have to try this!
charlestoncrafted says
Yes I recommend it! Just might have to double up thickness like I did if its too thin. Thanks for stopping by!
Jenny says
Cool project but you completely chopped off Michigan's upper peninsula!
charlestoncrafted says
Haha I was waiting for this! I totally butchered some of the lines- I am super unfamiliar with that part of the country (if you can't tell by the lack of pins) & cut the wrong part! Problem with this project is there's no going back! Hope I didn't cut you off my map! Thanks for stopping by 🙂
Lindsay H says
I found some pins maybe what you are looking for at a craft store called Craft Warehouse. Better than Michaels with the variety they carry, maybe you can purchase on-line or call. I know the pins are branded for corkboards. I purchased some there for a project I did a while ago. http://lindsayandevan.blogspot.com/2012/01/first-anniversary-present-for-bradachs.html
charlestoncrafted says
Oh that's great! I'll try to see if I can order them online- I hate how these black ones blend with the lines, especially since most of our travel is along the coast! Thanks for the great idea 🙂
Holly @JustTwoCraftySisters says
I LOVE travel inspired art! This turned out great. Glad I found you from the Winter Pinterest Challenge 🙂
charlestoncrafted says
Thanks! We are too 🙂 always good to take some of y tons of pins and try to actually get off my butt and do them!!!
Christine @ Casa-de-Christine says
This is really cute! I might just have to make one too! I made a pinnable map for my parents for Christmas but had trouble getting the map to glue to the cork. This idea avoids that step and looks great too!
charlestoncrafted says
Let me know if you do i love seeing other versions of projects! Thanks for checking it out!
Kim@NewlyWoodwards says
This is such a great project. I love that it's made of cork, making it so much easier to actually add the pins. Really great execution.
Stopping over from Decor and the Dog.
charlestoncrafted says
Thanks so much! The cork is awesome and cheap too. I also like how it has a cool texture to it- with everything around here pretty painted and whitewashed, it's nice to have something natural! Thanks for stopping by!
Ches says
Love it, such a neat idea. I am impressed with your steady hand to trace all the states.
charlestoncrafted says
Thanks! I did a really light line first haha I didn't just brave it full force sharpie. But yeah I was very afraid I'd sneeze and ruin the whole thing. Thanks for stopping by!
michelle@decorandthedog says
Ummm, I am in love with. I need to make one!! The heat is such a great tip!
charlestoncrafted says
Thanks! Please post if you do make one I'd love to see! Thanks for stopping by!