Learn how to extend your kitchen cabinets to the ceiling in this easy DIY guide. Discover the benefits, step-by-step instructions, and essential tips for creating a cohesive and spacious kitchen.
We are really into extending things and making them look bigger. If we do say so ourselves, we nailed it when we extended our fireplace to the ceiling and made the room look so much taller.
We also just extended our lower kitchen cabinets by adding open shelving and a tilt out trash can. But the newest thing we did was extend our upper kitchen cabinets to the ceiling using one piece of wood.
Be sure to check out the final results of our DIY coastal kitchen renovation!
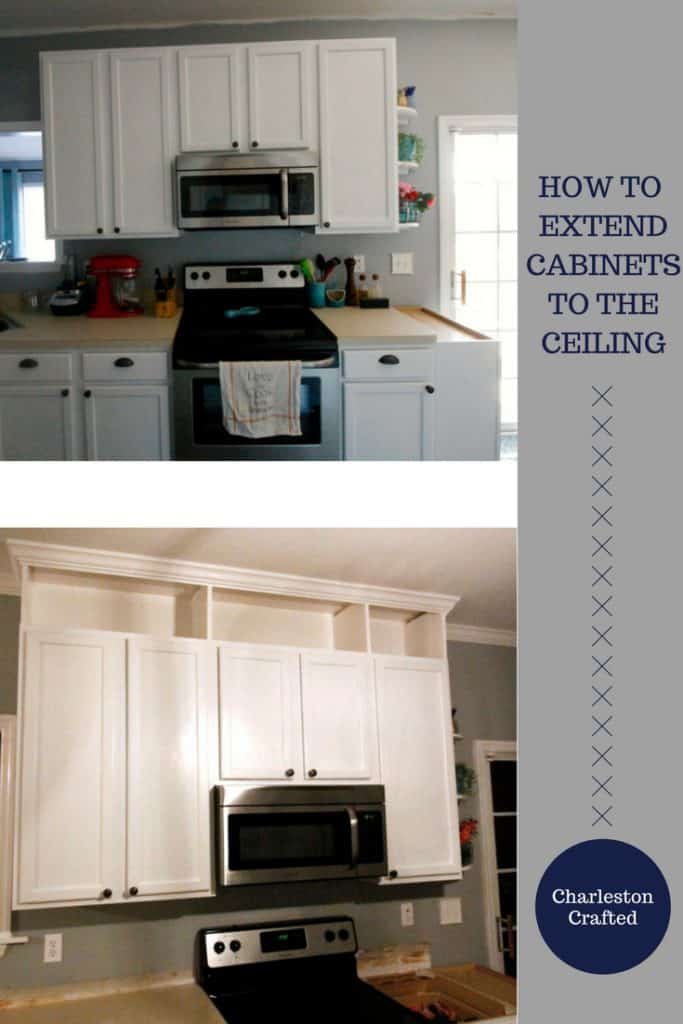
Benefits of extending kitchen cabinets to the ceiling
If you are planning to update your kitchen, extending your cabinets might not be the first project on your list. But, it is a great way to have a big impact for little cost. Some potential benefits to consider include:
- draws the eye upward and makes space look larger
- increased storage space
- elimination of dust-collecting areas above the cabinets
- can make kitchen feel more cohesive and grand
How to extend kitchen cabinets to the ceiling
This project is easy to do. We were extending the crown molding into the kitchen that we put up in the rest of our first floor and wanted to take the time to add height instead of just running the crown molding behind the cabinets.
Plus, there's nothing to do with that dead space above you're cabinets, so bring them up to the ceiling and make the area look more grand!
Necessary tools and materials:
- 1"x12" board
- Crown molding
- L-brackets
- Nail gun
- Paint + brush
Step one: Preparing the cabinets
Before extending the cabinets, it's essential to prepare them properly. Use pliers or a pry bar to remove any existing crown molding or trim.
Clean and sand the cabinets to ensure a smooth surface for attaching the extension boards, if the top of the cabinet needs it.
Step two: Measuring and cutting the extension boards
Carefully and accurately measure the height and width of the cabinets to determine the size of the extension boards needed.
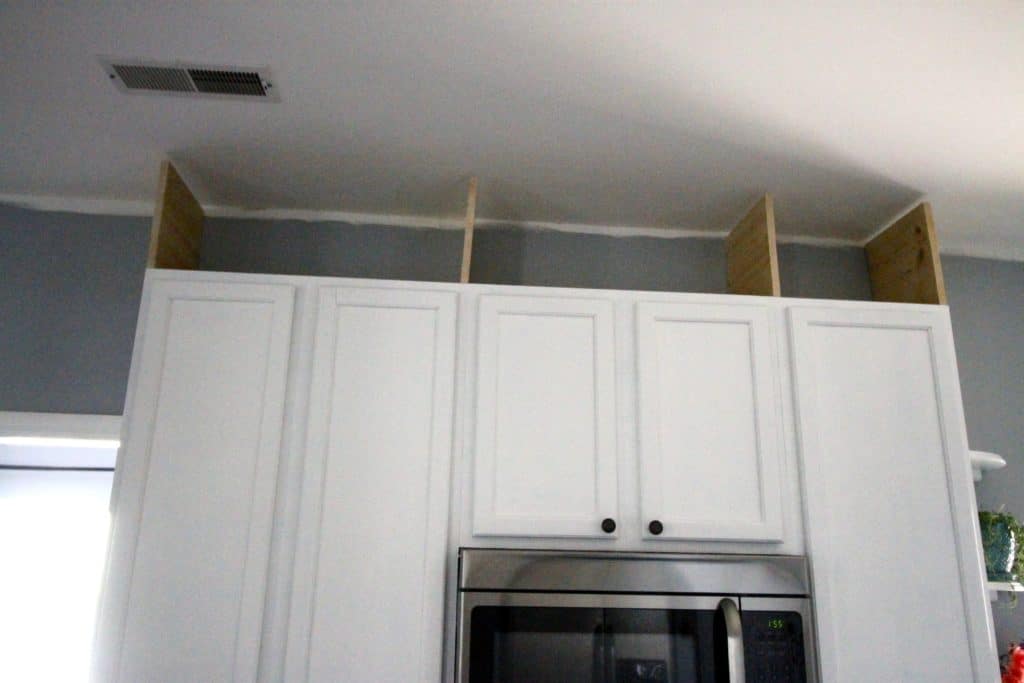
We chose to place one board on each "seam" between cabinet boxes and on the ends. You will also need enough molding to wrap the cabinet top horizontally - including the front and sides.
Step three: Build the extension
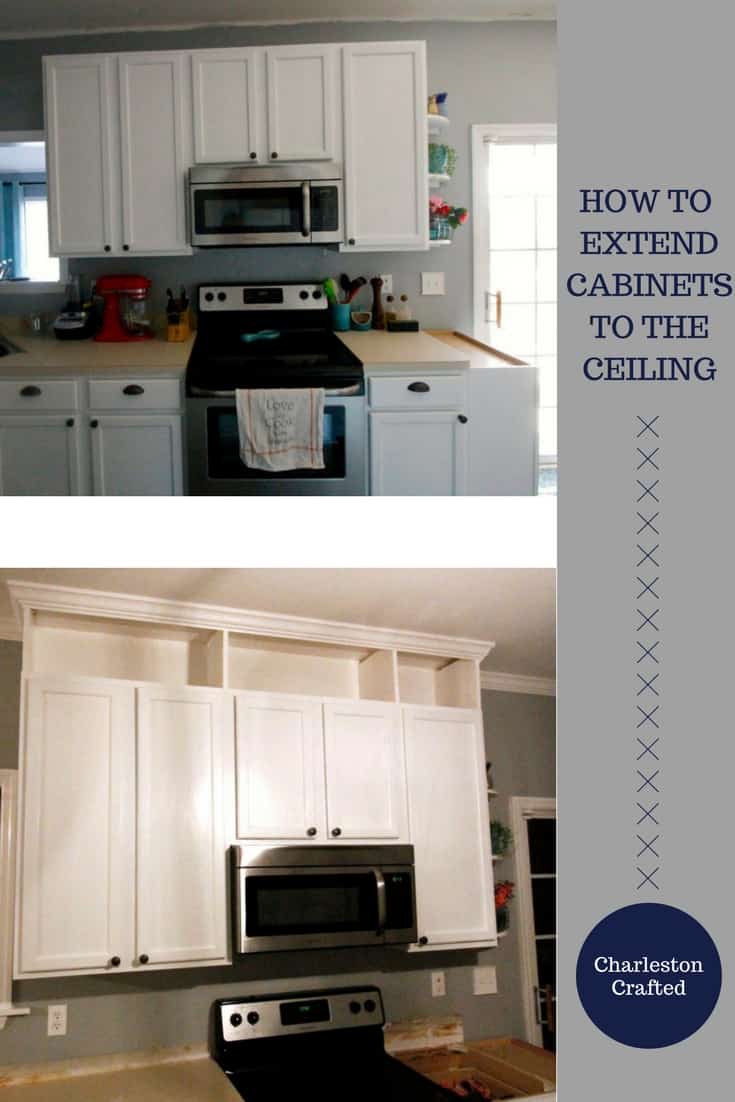
First, I got a six foot 1x12 board and cut it into four 12 inch sections.
Using L-brackets and a nail gun we attached them to the top of the cabinets and the wall.
To do this, screw one end of the bracket to the base of the cabinet and the other to the board you just cut. Repeat as needed until it feels secure.
Step four: Add crown molding
Then, we ran the crown molding around the front of these and shot nails into the boards to make it look like they were part of the cabinets.
If your room has crown molding already, choose molding that matches. Otherwise, choose one with a design that you prefer.
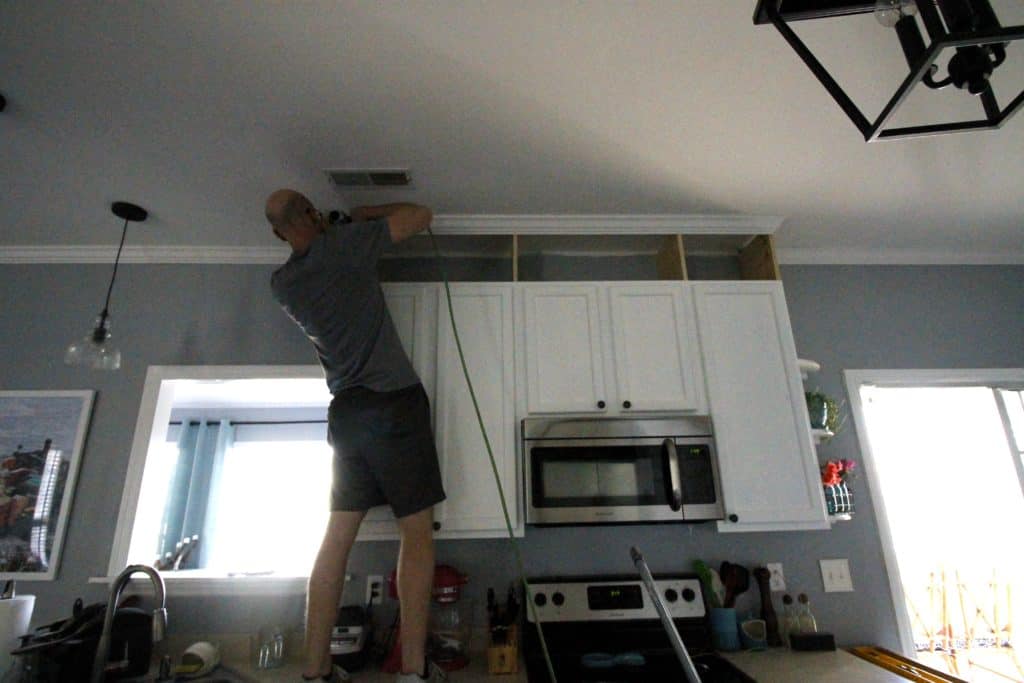
Step five: Finishing touches
Don't forget to finish the extended cabinets to achieve a cohesive look.
Before painting, you can use caulk or wood filler to fill any gaps or nail holes. Then, sand and paint.
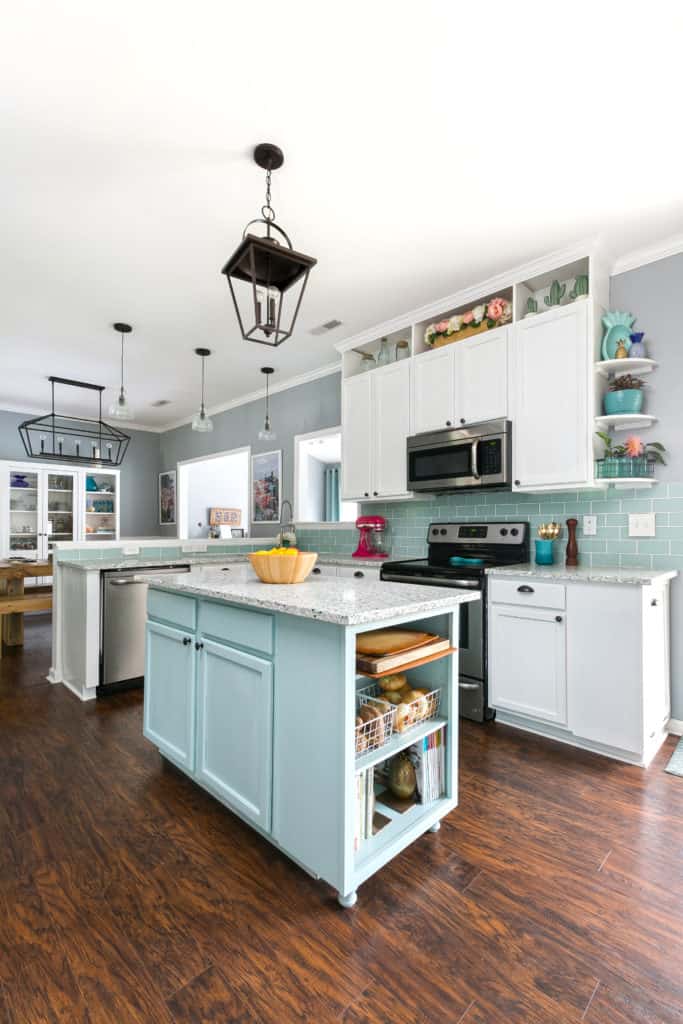
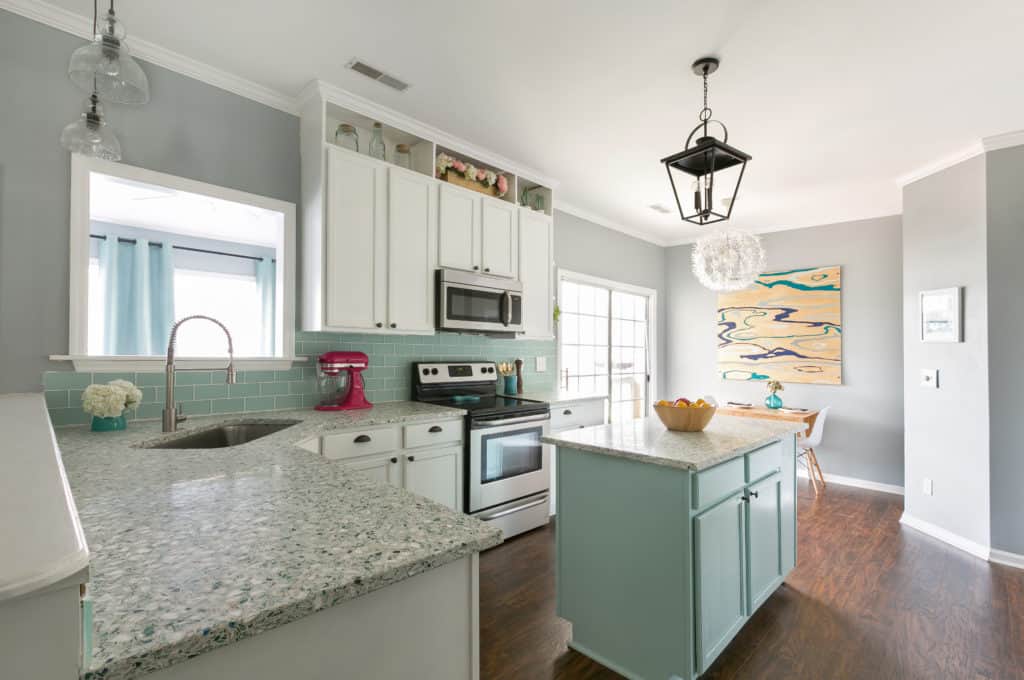
We painted our extension to match our cabinet color.
We painted the inside and out the same color as the cabinets and voila they all look like one.
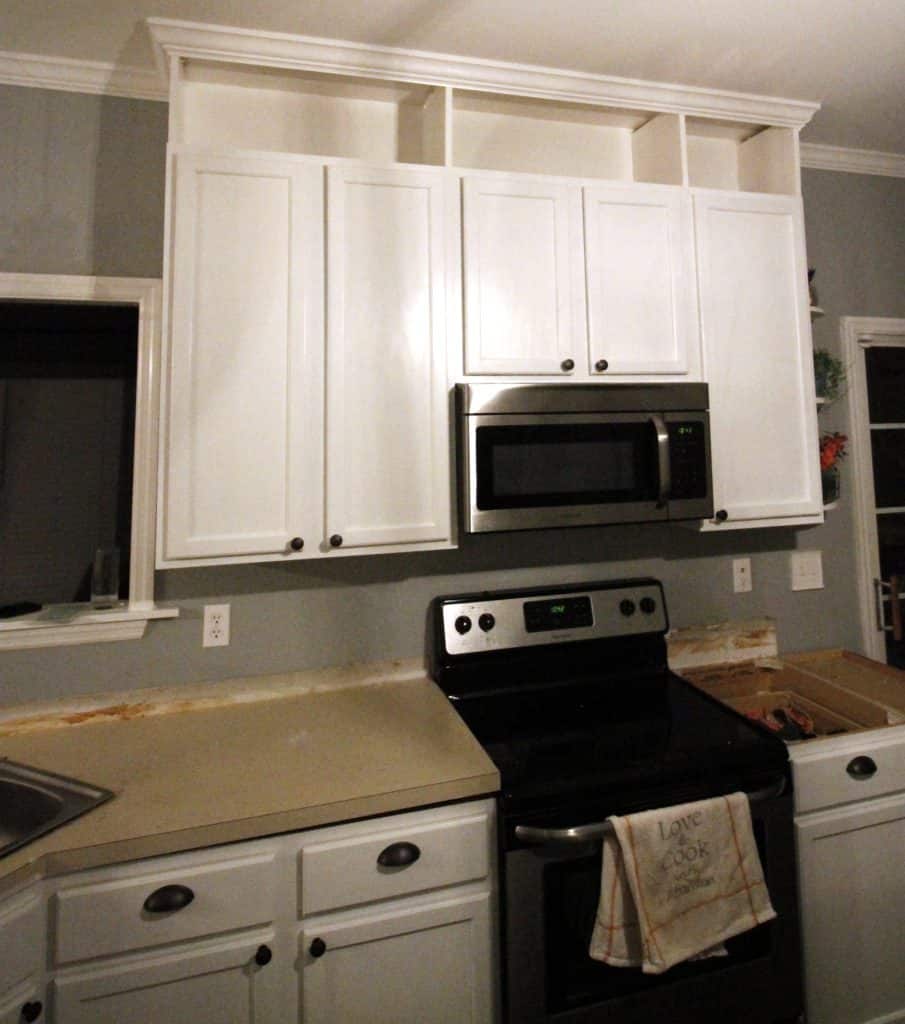
DIY taller kitchen cabinets
Now the cabinets look SO TALL and it makes it feel like we have so much more height in our kitchen!
A lot of people have asked us for advice on how to decorate over your kitchen cabinets - honestly, I think that extending the cabinets to the ceiling looks much nicer than filling the gap with fake plants!
I hope that we were able to show you how easy it is to extend your kitchen cabinets to the ceiling.
Be sure the check out some of our other most popular projects and get inspired!
How to extend kitchen cabinets to the ceiling
Does the gap between your upper cabinets and the ceiling bother you? Here's how to make it look purposeful by extending your kitchen cabinets to the ceiling.
Materials
- 1×12 board
- paint or stain to match cabinets
- crown molding
- L brackets
- flat brackets
Tools
- nail gun
- drill
- paint brush
Instructions
- Measure from the top of your cabinet to the ceiling. Ours was 12 inches.
- Cut your board to that length. Cut as many of these as you want - we did 4.
- Place the boards vertically as you want them to go over your cabinets.
- Use a nail gun to nail through the boards into the cabinets and ceiling.
- Drill a flat bracket or L bracket into each board and use it to connect to the top of the cabinets.
- Run crown molding across the top and nail into the vertical boards.
- Paint to match cabinets.
Recommended Products
As an Amazon Associate and member of other affiliate programs, I earn from qualifying purchases.
Looking for something?
We've been doing this since 2012 so we have a LOT of blog posts!
Search stuff like: Ceiling Projects | DIY Plant Stands | Thrift Flips


Hey there, I'm Sean, the woodworking enthusiast and builder behind CharlestonCrafted.com! Since 2012, I've been sharing the magic of turning raw materials into beautiful creations. I love teaching others the art and satisfaction of woodworking and DIY. I try to inspire fellow crafters to make something extraordinary out of nothing at all.


Liz says
I love this! This is exactly what we need in our kitchen. The cabinets look just a little too short. This would be perfect and I love the extra storage!
Gillian says
I love this budget friendly alternative! It makes your kitchen look so much taller!
Amanda Rodriguez says
Definitely saving this!!! I was just thinking the other day how I wish our kitchen cabinets extended to the cieling so this is perfect! I also noticed that you replaced your countertops with granite which is what we'd like to do as well!
Morgan says
Yes those got done the day after the cabinets did! It's actually recycled glass. I'll be talking all about them on Monday 😀
Kelley @ Coastal Kelder says
These turned out great! Bet you love the extra storage space
Erin, Attention to Darling says
These look awesome, great job you guys!!!
Erin, Attention to Darling
http://www.attentiontodarling.com
Aimee Mars says
I love cabinets that go to the ceiling! I feel like they're just floating there when they don't. This is a great project.
Morgan says
thanks so much! I agree it was so simple & really really makes them look more built in.
Meghan says
Wow! This is a great idea! I was just scheduling up some posts to share on our Facebook page in the coming weeks and saw this. Most of the time, open-top cabinets just end up looking bare or cluttered, but your extensions really pull the space together. Mine don't go all the way up to the ceiling, but the space above is closed off. Kinda wishing it was open after seeing what you did.
Christie says
I love this! These are beautiful. I really want to do this, but I have a few questions if you don't mind. What size of L brackets did you use? And did you only attach the L brackets to the bottom of the boards? And with the crown moulding, did you nail it to the ceiling?
Sean says
Hi Christie! Thanks so much for visiting and please do tag us if you do do this.
The L brackets are just two inches on each side of the angle. So 2x2 brackets. We did those just on the bottom and then used the nail gun to shoot a nail through the top of the board into the ceiling. And yes, with the crown moulding, we nailed it both into the ceiling and into the boards that we had attached. For the moulding on the sides, the nail went through the board, so we then just bent off the part that was showing. Hope this works for you. Please let me know if you need anymore clarification!
Paula Petroff says
HI you two,
I love what you have done with extending the cabinets to the ceiling and by far the least labor intensive Pinterest post I've seen in doing so. Do you mind sharing what gauge of nail and length you used and the size of your crown moulding. We are hopefully getting our cabinets painted in October and really want to extend the cabinets prior to then. We are also looking to add wainscoting to the end of our cabinets and around our island. Thought it might look neat to apply some to the wall where we extend up.
You have a wonderful site and everything is just fabulous, from the photography to the very easy to follow instructions.
Blessings,
Paula
Sean says
Hey Paula, so glad you like them! Yes, adding these boards and putting molding around the outside made them look like they had always been there and was super easy to do. We used an 18 gauge nailer with I think 1.5 inch nails, but they did stick out on the inside of the board. It wasn't a big deal because they aren't very thick, so I just snapped them off with a pair of pliers and it was fine. Hope that helps. Share a pic with us when you're done!
Victoria says
Hello!! I am redoing my cabinets and this is the best extension tutorial I've found. Do you mind taking a photo of how the l brackets are attached? I'm wondering if it's going to be wobbly with them only attached at the bottom? Or was I reading it wrong? Thanks so much!
Sean says
Hey Victoria! Glad you like it! The L-brackets are just screwed in at the right angles between the board and the cabinet and the board and the back wall. We put the L-brackets at the bottom and it was pretty stable at that point and not wobbly, but then we just used the nail gun to shoot a couple nails through the board into the wall to make sure. Then running the crown around it was yet another stabilizer. But the L-brackets and nails are what really do it. Hope that helps!
Beth spear says
Just a question on cleaning. Do you have great ideas on ways to keep that greasy dust off? Above the stove is the worst!
Morgan says
All I do is wipe it with a damp cloth, same as my cabinets!
Pat says
I have a similar design but it's drab orange brown cabinets I just want to say I love your colors and how you've designed the islands they are just beautiful I'm over 60 so I would not be able to do something like that but I just wanted to say and how much I like your whole kitchen area and the colors
LiAna says
7 hours on the internet looking for a way to extend my cabinets, without freaking out my hubby and VOILA! I found your amazing way to do it. So easy and cost efficient! THANK YOU
Liana says
Can you tell us what is the height of your kitchen ceiling? Also what height are your upper cabinets? (30/36/42) and finally, what spacing do you have from the counter top to the bottom of upper cabinets?
Shannon says
Thanks so much for your tutorial! I do have a stupid question though…what do you mean by shooting nails from the top of the board into the ceiling? I’m thinking if the board is perpendicular to the ceiling, how is that possible! Ha! Thanks!
Morgan says
Not stupid, I see how that's confusing! I meant shoot the nail basically through the outside of the board at the top, up through the top of the board and into the ceiling at an angle. Make better sense?