• Skip to primary navigation
  • Skip to main content
  • Skip to primary sidebar
Charleston Crafted
  • DIY
  • Woodworking
  • Popular Posts
  • Blog
  • About
  • Shop
menu icon
go to homepage
  • DIY
  • Woodworking
  • Popular Posts
  • Blog
  • About
  • Shop
search icon
Homepage link
  • DIY
  • Woodworking
  • Popular Posts
  • Blog
  • About
  • Shop
×
Home » Home Projects

How to Tie a Monkey Fist Doorstop

Published: Mar 18, 2013 · Modified: Mar 19, 2020 by Sean · As an Amazon Associate, we earn from qualifying purchases. This site contains affiliate links. ·

[wp_ad_camp_1]

Sean here! One of my "assignments" when I left for Maryland was that Morgan had seen a great idea to make a monkey fist knot doorstop. It's a great idea for anywhere, but especially for any nautical-themed room in your house.

I'm an Eagle Scout, so I know a lot of knots, but I needed a refresher since it's been a few years. I watched this video on YouTube which gave a great step-by-step.

I started out with about 15 feet of ¾" rope from Lowe's. It was like $0.58 per foot so it was way cheaper than buying one of these doorstops online for anywhere between $25-50.

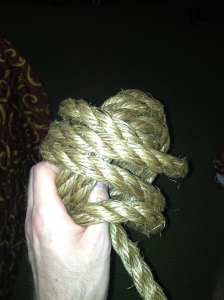
First, wrap the rope around your hand three times.

Monkey Fist Doorstop - Charleston Crafted

Then, wrap it around the other direction, starting with the loop on the bottom.

Monkey Fist Doorstop - Charleston Crafted

Then comes the tricky part. Now you have to thread the rope around the second set loops in the same direction as the first set up loops (I'd recommend watching the video here to really know where the rope needs to go).

Monkey Fist Doorstop - Charleston Crafted

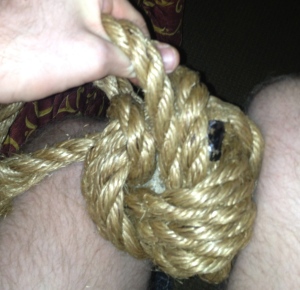
The knot is going to be very loose if you did it right. At this point, if you really want to use this as a doorstop, you probably need some weight to it to hold the door open. So find a small round rock, and slide it into the knot in one of the gaps.

Monkey Fist Doorstop - Charleston Crafted

Now comes the next tricky part. You have to tighten the knot around the rock. You're going to want to tighten using end you were using to wrap it. The original end you had wrapped around your hand is going to get longer, but that's going to be good for making the handle later.

Monkey Fist Doorstop - Charleston Crafted

Tada!!! Now you have a tightened monkey fist doorstop!! But you're going to have two ends of rope now. The short one, you're going to want to cut off.

Monkey Fist Doorstop - Charleston Crafted

Now just loop the end of rope over and super glue it to another corner of rope and you have a handle!

Monkey Fist Doorstop - Charleston Crafted

How awesome is that? And it could totally hold open the automatically-closing door of my hotel room! It's going to look great in the subtlety-nautical living room.

Ever made a monkey fist doorstop? Any other nautical projects?

[wp_ad_camp_2]

Sean headshot cropped
Sean

Hey there, I'm Sean, the woodworking enthusiast and builder behind CharlestonCrafted.com! Since 2012, I've been sharing the magic of turning raw materials into beautiful creations. I love teaching others the art and satisfaction of woodworking and DIY. I try to inspire fellow crafters to make something extraordinary out of nothing at all.

More Feeling Pinspired

  • Wedding Brainstorming!
  • Feeling House Envy
  • Lilly Pulitzer Inspired Monogrammed Sweater!
  • Guest Bathroom design plan

Reader Interactions

Comments

  1. Allyson says

    March 22, 2013 at 1:41 pm

    this is very confusing to me, because I am a total klutz! It came out so cute though! Thanks for sharing this on Domestic Superhero's link party this week!

    • Sean says

      March 28, 2013 at 10:26 pm

      I'm sorry! It isn't the easiest thing to convey on a blog post with words. I really recommend that video, it helps a lot!

  2. Jen says

    May 31, 2013 at 6:43 am

    Hi, I came across your website while looking for a tutorial on this, and was wondering approx how large the completed knot was. The door I'm making this for has about 7" clearance above the ground, so I need it to be pretty big. Could I adjust the size easily by using a larger rock and a little more rope?? Thank you!

    • Sean says

      May 31, 2013 at 9:39 am

      Hey Jen! Thanks for checking it out. Mine turned out to be probably six inches in diameter. You could definitely make it as big as you wanted with a bigger rock and more rope. The only thing I'd watch out for would be making it too big because it would be tough to manage in your hands. Good luck though! Share a picture when you're done!

      • Jen says

        May 31, 2013 at 12:23 pm

        Great, thank you! This will hopefully be my weekend project; I'll let you know how it goes!

Primary Sidebar

Charleston Crafted about us image

Hey y'all!

We are Morgan & Sean McBride and we are crafting our home together in Charleston, South Carolina.

More about us

Popular Posts

  • DIY Coffered Ceiling
    DIY Coffered Ceiling
  • How to Make DIY Concrete Pumpkins via Charleston Crafted
    How to Make DIY Concrete Pumpkins
  • How to Make a Cupid's Arrow Valentine's Day Wall Hanging with felt on the Cricut
    How to make a Cupid's Arrow Valentine's Day Wall Hanging
  • Our Tropical Oasis - A backyard Hammock area - Charleston Crafted
    Our Tropical Oasis

Recent Posts

  • how to organize a pantry with zones
    How to Organize Your Pantry in Zones (And Why It’s a Game Changer)
  • Keep outdoor rug from blowing up - Charleston Crafted
    How to keep your outdoor rug in place
  • kitchen design mistakes to avoid
    Kitchen design mistakes to avoid
  • DIY Faux Tropical Window Box That Looks Real (But Won’t Die!)

Privacy Policy

Footer

↑ back to top

Navigation

  • Home
  • Blog
  • Contact Us
  • Terms of Use
  • Disclaimer

Newsletter

  • Sign up for emails and updates
  • Follow us on Instagram
  • Work with Us

Browse by Category

  • Woodworking
  • Home Projects
  • Paint Colors
  • Room Reveals

© 2025 The Charleston Crafted Blog LLC DBA “Charleston Crafted” and “CharlestonCrafted” (also known as N/A) / All Rights Reserved.
Official Website: (Charleston Crafted)
Registered in USA (Co. Reg. No.: 565586)
Address: Charleston, USA 29414, South Carolina
Contact Phone: Not applicable — contact is via email: sean@charlestoncrafted.com

DISCLAIMER: The content on this website is provided for general informational purposes only and is not intended as professional advice. The Charleston Crafted Blog LLC and The Charleston Crafted Blog LLC make no representations or warranties—express or implied—regarding the accuracy, completeness, or suitability of the information contained herein. Any reliance you place on this information is strictly at your own risk. In no event shall The Charleston Crafted Blog LLC or The Charleston Crafted Blog LLC be liable for any loss or damage, including without limitation, indirect or consequential loss or damage, arising from the use or inability to use this website. This website is the official website of The Charleston Crafted Blog LLC.

AFFILIATE DISCLOSURE: This website contains affiliate links. If you click through and make a purchase, we may earn a commission at no extra cost to you.

As an Amazon Associate, I earn from qualifying purchases.

Site Editor: Morgan Smith McBride

Copyright © 2025 Charleston Crafted