• Skip to primary navigation
  • Skip to main content
  • Skip to primary sidebar
Charleston Crafted
  • DIY
  • Woodworking
  • Popular Posts
  • Blog
  • About
  • Shop
menu icon
go to homepage
  • DIY
  • Woodworking
  • Popular Posts
  • Blog
  • About
  • Shop
search icon
Homepage link
  • DIY
  • Woodworking
  • Popular Posts
  • Blog
  • About
  • Shop
×
Home » Home Projects

Round Side Table Makeover

Published: Sep 24, 2012 · Modified: Dec 1, 2023 by CharlestonCrafted · As an Amazon Associate, we earn from qualifying purchases. This site contains affiliate links. ·

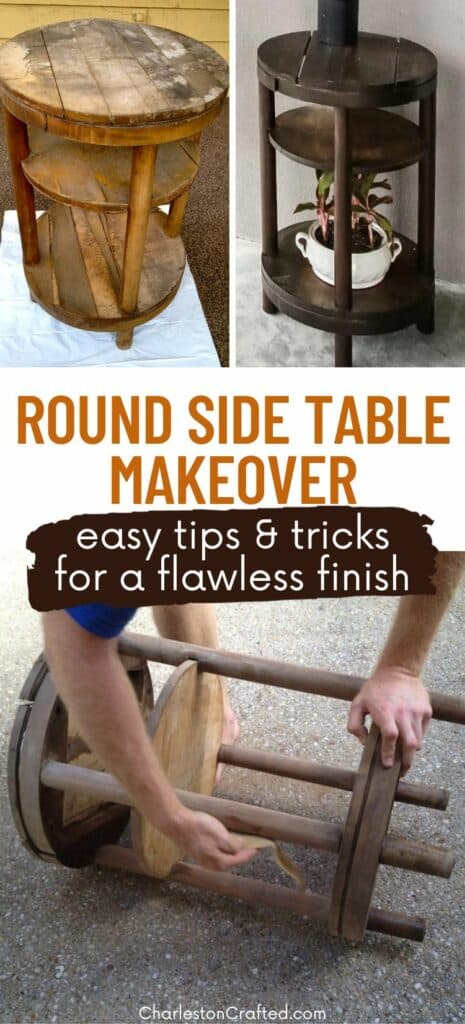
Check out this round side table makeover! It's a great table before and after featuring a wooden side table we saved from the dumpster!

Sean found this side table next to the dumpster in his apartment complex years ago.

It has been since sitting on his screened porch collecting dust and getting, if possible, even ickier.

Side Table Before - Charleston Crafted

As you can see, the table is wood, but has layers of thin wood (fake wood?) on each surface that are really gross and peely. And yes, it has been sitting, just like this, for actual years.

The wood veneer has completely peeled off in areas, but the inner wood - and the lines of the piece - are actually pretty good.

Peeling Wood - Charleston Crafted

I finally had enough and insisted that we get a move on it. So, we buckled down and (during commercial breaks on the Panthers game for Sean) to give this table a complete makeover.

Scraping Wood - Charleston Crafted

Round side table makeover

Here's what we did to upcycle this old, water damaged wooden table.

Supplies used:

  • Scraper
  • Sanding block
  • Wood stain + brush to apply
  • Polyurethane
round side table makeover

Steps to repair + refinish this wooden table

STEP 1: Remove damaged veneer

The first step was to remove all of the peeling and damaged super thin wood coating.

This took a lot longer than expected. Sean had to use this metal scraper to get some of the tough bits.

However, when we finally got it off, it automatically looked 1,000 times better.

Side Table Before - Charleston Crafted

Look how much crap we pulled off! WOW!

Gluing Table - Charleston Crafted

STEP 2: Repair gaps in the wood

Then we noticed that the top of the table was kind of warped. Maybe from sitting in next to a dumpster for an indeterminate period of time. Or maybe its just warped out of protest of being ignored on the porch for so long.

Have no fear, Sean filled the gaps with wood glue (we used Gorilla Glue Wood Glue) and used clamps to squeeze it back together.

After around an hour, it was dry enough to remove the clamps and proceed.

For small gaps, you could use wood filler. Just let it dry completely and then sand it smooth. Here's our complete guide on how to use wood filler!

Fixing a Warped Table - Charleston Crafted

STEP 3: Sand

Next, we sanded the whole thing down really well. We used regular sand paper (80 grit) on the legs and curvy bits and this nifty sandpaper block for the flat parts.

Its a plastic thing that you slip a piece of sandpaper in (we cut a bit off of a larger piece of sandpaper) and makes it so much easier to hold and use!

If you have an orbital sander, use that. Sanding by hand takes longer, but is a great alternative if you don't have access to an electric sander!

Sanding a Table - Charleston Crafted

STEP 4: Clean

After you sand it really well, your table will be dusty.

Use a damp cloth to wipe off the dust and see if it needs any touch ups.

Sanding a Table - Charleston Crafted

STEP 5: Stain

Next came the fun part! We painted on Rustoleum ultimate wood stain in dark walnut using a foam brush.

It's best to apply wood stain in the direction of the wood grain, let it sit for about 15 minutes, and then wipe off any excess.

Repeat this process for a second coat if you want a darker final color.

Staining a Table - Charleston Crafted

I stretched a rubber band around the can so I could scrape any excess stain off of the brush.

Staining a Table - Charleston Crafted

Staining a Table - Charleston Crafted

Cici wanted to come help so badly! Too bad puppies don't have thumbs or we would have let her!

Staining a Table - Charleston Crafted

It turned out so yummy! I love this darker color, I just think dark wood looks so much richer and more expensive than light wood.

Staining a Table - Charleston Crafted

We let it dry over night. Meanwhile, we both had stain all over our hands.

It won't come off at all with soap, so we thought we'd share this little trick- rub vegetable oil all over the stained area, then rinse with warm water. It magically all comes off!

How to Seal a Table - Charleston Crafted

STEP 6: Seal

Finally, we sealed the table. It took 3 thin coats of Polycrylic Protective Finish Clear Satin sealant with light sandings in between.

This was tedious, but we wanted to make sure it would withstand cups without coasters and wet rag wipe downs in case it (inevitably) gets pollen-y in the spring.

How to Seal a Table - Charleston Crafted

Now here's a reminder of how it first looked:
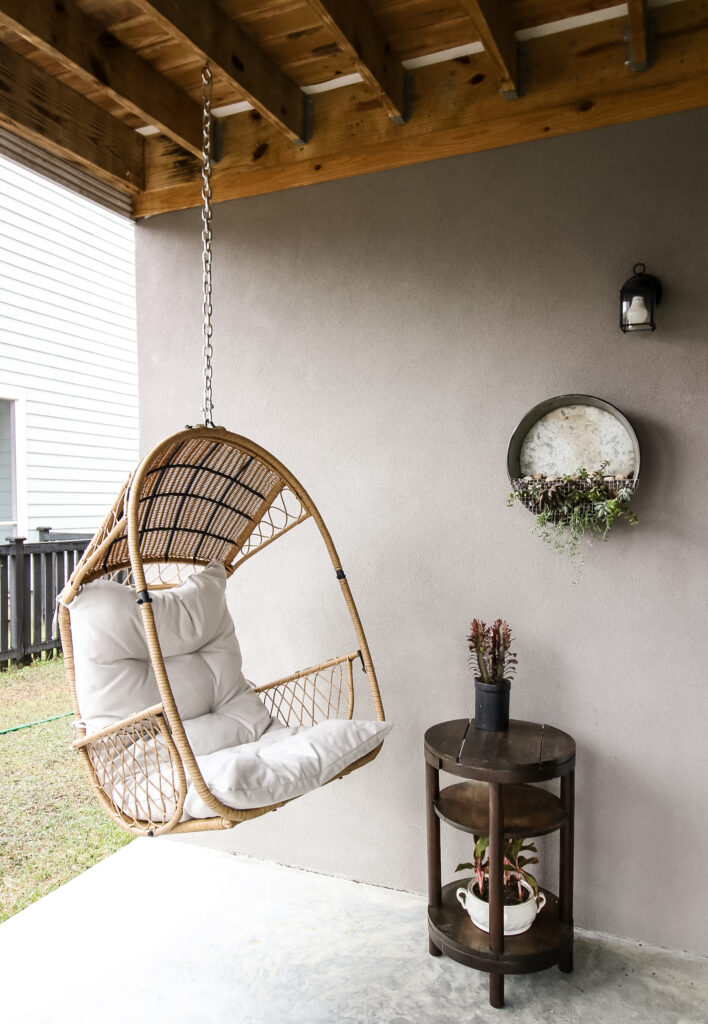
Side Table Before - Charleston Crafted

And here it is now:

Side Table Make Over - After - Charleston Crafted

So much better! We are beyond thrilled with it. Sean is kicking himself for not doing this two years ago! 

UPDATE:

We originally made over this table in 2012 (yes, hello, that is youthful Morgan in those pictures up there!) Here it is in 2023 on our covered patio! Still going strong!

One of my most treasured furniture before and afters, because it was the first piece we ever made over together 🙂

wooden side table on a covered patio
Side Table Before and After - Charleston Crafted

P.S. - Look under our Cozumel memory jar for a sneek peek of our latest craft coming at you soon!

Want more side table makeovers?

  • Campaign side table makeover
  • Chip + salsa dish into a side table
  • Side table from counter top scraps
  • DIY River table with epoxy
  • Spray paint side table makeover
Charleston Crafted Signature

Follow us on:
Pinterest | Instagram | TikTok | YouTube | Facebook | Amazon Storefront | LTK Shop

Looking for something?

We've been doing this since 2012 so we have a LOT of blog posts!
Search stuff like: Ceiling Projects | DIY Plant Stands | Thrift Flips

Charleston Crafted logo banner
CharlestonCrafted

More Home Projects

  • DIY floating corner shelves - Charleston Crafted
    How to make floating corner shelves
  • how to assess your home renovation needs
    How to assess your home renovation needs
  • Top Mistakes to Avoid When Renovating Your Home
    Top Mistakes to Avoid When Renovating Your Home
  • How to create a DIY home renovation plan
    How to create a DIY home renovation plan

Reader Interactions

Comments

  1. arzea says

    September 24, 2012 at 12:09 pm

    This turned out fabulous!!! I love it!!!

    • charlestoncrafted says

      September 24, 2012 at 1:03 pm

      Thanks! I had no idea how it would go but figured I had very little to lose and am so happy with it!

  2. Donna A. Hansen says

    March 19, 2013 at 11:23 pm

    It looks definitely so much better than how it was. You must really be happy with the result. What an amazing job you just did! Thanks for sharing!

  3. Trisha D. says

    August 27, 2013 at 8:42 am

    Ahh I love salvaged sad little pieces turned glorious makeover glamorous!! Kinda like the movie with Freddie Prince Jr.-- She's All That.

    Such a great break from painted furniture. That stain color is very dark, moody and perfect.

    The beau always gives me the 'eyebrow' when I shamelessly pull some treasure out of the trunk.

    • Morgan says

      August 27, 2013 at 9:17 am

      haha well sean actually salvaged this one. difference was, he was using it in its decrepit state.....

  4. Mari of crab+fish says

    September 04, 2013 at 6:33 pm

    WOW, what a transformation! I love seeing old finds transformed and ready to be loved again.

Trackbacks

  1. Repurposed Furniture: 20 Surprisingly Clever Ideas You Have To See says:
    April 17, 2021 at 7:38 am

    […] and imagine that it had any potential at all? Morgan and Sean completely gave this warped and worn side table some much needed love. It’s hard to believe it’s even the same piece of […]

Primary Sidebar

Charleston Crafted about us image

Hey y'all!

We are Morgan & Sean McBride and we are crafting our home together in Charleston, South Carolina.

More about us

Popular Posts

  • DIY Coffered Ceiling
    DIY Coffered Ceiling
  • How to Make DIY Concrete Pumpkins via Charleston Crafted
    How to Make DIY Concrete Pumpkins
  • How to Make a Cupid's Arrow Valentine's Day Wall Hanging with felt on the Cricut
    How to make a Cupid's Arrow Valentine's Day Wall Hanging
  • Our Tropical Oasis - A backyard Hammock area - Charleston Crafted
    Our Tropical Oasis

Recent Posts

  • how to organize a pantry with zones
    How to Organize Your Pantry in Zones (And Why It’s a Game Changer)
  • Keep outdoor rug from blowing up - Charleston Crafted
    How to keep your outdoor rug in place
  • kitchen design mistakes to avoid
    Kitchen design mistakes to avoid
  • DIY Faux Tropical Window Box That Looks Real (But Won’t Die!)

Privacy Policy

Footer

↑ back to top

Navigation

  • Home
  • Blog
  • Contact Us
  • Terms of Use
  • Disclaimer

Newsletter

  • Sign up for emails and updates
  • Follow us on Instagram
  • Work with Us

Browse by Category

  • Woodworking
  • Home Projects
  • Paint Colors
  • Room Reveals

© 2025 The Charleston Crafted Blog LLC DBA “Charleston Crafted” and “CharlestonCrafted” (also known as N/A) / All Rights Reserved.
Official Website: (Charleston Crafted)
Registered in USA (Co. Reg. No.: 565586)
Address: Charleston, USA 29414, South Carolina
Contact Phone: Not applicable — contact is via email: sean@charlestoncrafted.com

DISCLAIMER: The content on this website is provided for general informational purposes only and is not intended as professional advice. The Charleston Crafted Blog LLC and The Charleston Crafted Blog LLC make no representations or warranties—express or implied—regarding the accuracy, completeness, or suitability of the information contained herein. Any reliance you place on this information is strictly at your own risk. In no event shall The Charleston Crafted Blog LLC or The Charleston Crafted Blog LLC be liable for any loss or damage, including without limitation, indirect or consequential loss or damage, arising from the use or inability to use this website. This website is the official website of The Charleston Crafted Blog LLC.

AFFILIATE DISCLOSURE: This website contains affiliate links. If you click through and make a purchase, we may earn a commission at no extra cost to you.

As an Amazon Associate, I earn from qualifying purchases.

Site Editor: Morgan Smith McBride

Copyright © 2025 Charleston Crafted